顯示具有 Lua 標籤的文章。 顯示所有文章

2015年4月9日 星期四

NodeMCU - NTP Client


今天想到要利用NTP Server 來 Sync 時間 , 搜尋了一下,找到了這個連結 ........


ntp.lua 內容如下:

-- -----------------------------------------------------------------------------------
-- for a continuous run:
-- TIME=loadfile("ntp.lua")()
-- TIME:run(timer,updateinterval,syncinterval,[ntp-server])
-- TIME.hour TIME.minute TIME.second are updated every 'updateinterval'-seconds
-- NTP-server is queried every 'syncinterval'-seconds
--
-- a one-time run:
-- ntprun=loadfile("ntp.lua")
-- ntprun():sync(function(T) print(T:show_time()) end)
--
-- config:
-- choose a timer for udptimer
-- choose a timeout for udptimeout 
--    timer-function to close connection is needed - memory leaks on unanswered sends :(
-- set tz according to your timezoneddddddd
-- choose a NTP-server near you and don't stress them with a low syncinterval :)
-- -----------------------------------------------------------------------------------

return({
    hour=0,
    minute=0,
    second=0,
    lastsync=0,
    ustamp=0,
    tz=8,
    udptimer=2,
    udptimeout=1000,
    ntpserver="193.170.62.252",
    sk=nil,
    sync=function(self,callback)
        -- print("SYNC " .. self.ustamp .. " " .. self.ntpserver)
        -- request string blindly taken from http://arduino.cc/en/Tutorial/UdpNTPClient ;)
        local request=string.char( 227, 0, 6, 236, 0,0,0,0,0,0,0,0, 49, 78, 49, 52,
        0,0,0,0,0,0,0,0,0,0,0,0,0,0,0,0,0,0,0,0,0,0,0,0,0,0,0,0,0,0,0,0
        )
        self.sk=net.createConnection(net.UDP, 0)
        self.sk:on("receive",function(sck,payload) 
            -- tmr.stop(self.udptimer)
            sck:close()
            self.lastsync=self:calc_stamp(payload:sub(41,44))
            self:set_time()
            if callback and type(callback) == "function" then 
                callback(self)
            end
            collectgarbage() collectgarbage()
            -- print("DONE " .. self.ustamp)
        end)
        self.sk:connect(123,self.ntpserver)
        tmr.alarm(self.udptimer,self.udptimeout,0,function() self.sk:close() end)
        self.sk:send(request)
    end,
    calc_stamp=function(self,bytes)
        local highw,loww,ntpstamp
        highw = bytes:byte(1) * 256 + bytes:byte(2)
        loww = bytes:byte(3) * 256 + bytes:byte(4)
        ntpstamp=( highw * 65536 + loww ) + ( self.tz * 3600)    -- NTP-stamp, seconds since 1.1.1900
        self.ustamp=ntpstamp - 1104494400 - 1104494400         -- UNIX-timestamp, seconds since 1.1.1970
        -- print(string.format("NTP: %u",ntpstamp))
        -- print(string.format("UIX: %u",self.ustamp))
        return(self.ustamp)
    end,
    set_time=function(self)
        self.hour = self.ustamp % 86400 / 3600
        self.minute = self.ustamp % 3600 / 60
        self.second = self.ustamp % 60
        -- print(string.format("%02u:%02u:%02u",hour,minute,second))
    end,
    show_time=function(self)
        return(string.format("%02u:%02u:%02u",self.hour,self.minute,self.second))
    end,
    run=function(self,t,uinterval,sinterval,server)
        if server then self.ntpserver = server end
        self.lastsync = sinterval * 2 * -1    -- force sync on first run
        tmr.alarm(t,uinterval * 1000,1,function()
            self.ustamp = self.ustamp + uinterval
            self:set_time()
            -- print(self:show_time())
            if self.lastsync + sinterval < self.ustamp then
                self:sync()
            end
        end)
    end
})


測試了一下,真的能用, 輸出如下:

> ntptable=loadfile("ntp.lua")()
> --調整時區設定, 在這我設成台北時間: GMT+8
> ntptable.tz=8
> --設定timerid=1 , 定時每1秒從"tock.stdtime.gov.tw"讀取NTP時間
> ntptable:run(1,1,0,"211.22.103.157")
> print(ntptable:show_time())
05:10:38
> print(ntptable:show_time())
05:11:20


or

> ntpfun=loadfile("ntp.lua")
> ntpfun():sync(function(T) print(T:show_time()) end)
> 05:15:59
ntpfun():sync(function(T) print(T:show_time()) end)
> 05:16:29


or

> ntptable=loadfile("ntp.lua")()
> ntptable:sync(function(T) print(T:show_time()) end)
> 05:15:59
ntptable:sync(function(T) print(T:show_time()) end)
> 05:16:29


註:別忘了要設時區,不然時間會有時差的....

另外,若有需要,可自行依當地時區,再進行日光節約時間校正 .....

以下為台灣國家時間與屏率標準實驗室NTP Server :
tock.stdtime.gov.tw  211.22.103.157
watch.stdtime.gov.tw  118.163.81.63
time.stdtime.gov.tw  118.163.81.61
clock.stdtime.gov.tw  211.22.103.158
tick.stdtime.gov.tw  118.163.81.62


相關參考資料:

鳥哥的Linux 私房菜-- NTP 時間伺服器

NTP 伺服器位址 - 國家時間與頻率標準實驗室

NTP - Wikipedia

夏令時間- 維基百科,自由的百科全書 - Wikipedia


2015年4月8日 星期三

NodeMCU - uploader and file module


file module

file.remove
file.open
file.close
file.readline
file.writeline
file.read
file.write
file.flush
file.seek
file.list
file.format
file.rename


nodemcu-uploader.py

A simple tool for uploading files to the filesystem of an ESP8266 running NodeMCU as well as some other useful commands.

Usage


--port and --baud are set to default /dev/ttyUSB0 and 9600 respectively.


mark@mark-laptop:~/nodemcu-uploader-master$ sudo ./nodemcu-uploader.py --port /dev/ttyUSB3 file format
Formating...
file.format()

mark@mark-laptop:~/nodemcu-uploader-master$ sudo ./nodemcu-uploader.py --port /dev/ttyUSB3 upload init.lua
Preparing esp for transfer.
Transfering init.lua as init.lua
All done!

mark@mark-laptop:~/nodemcu-uploader-master$ sudo ./nodemcu-uploader.py --port /dev/ttyUSB3 file list
Listing files
for key,value in pairs(file.list()) do print(key,value) end
init.lua    32
> 

mark@mark-laptop:~/nodemcu-uploader-master$ sudo ./nodemcu-uploader.py --port /dev/ttyUSB3 download init.lua:new.lua
Transfering init.lua to new.lua
All done!


註: 燒錄新版 Firmware後 ,先前所放入的lua file會依然存在,不會被覆蓋,僅nodemcu firmware
被更新....

mark@mark-laptop:~/esptool$ sudo ./esptool.py --port /dev/ttyUSB0 read_mac
Connecting...
MAC: 18:fe:34:9e:99:29
mark@mark-laptop:~/esptool$ sudo ./esptool.py --port /dev/ttyUSB0 flash_id
Connecting...
Manufacturer: ef
Device: 4016

2015年4月1日 星期三

NodeMCU固件- node/wifi/net/uart module


參考連結: NodeMCU API指令 


node module

node.led  --deprecated
node.key --deprecated
node.readvdd33 --deprecated

node.input
node.output
node.compile
node.info
node.chipid
node.flashid
node.heap
node.restart

> print(node.info())
0 9 6 10492404 1458415 4096 2 40000000
==>SDK Version : 0.9.6
==>chipid : 10492494
==>flashid:1458415  (0x1640EF) 0xEF代表Winbond , 0x4016對應32Mbits
==>flashsize=4096 KBytes
==>flashmode=2 (DIO)

==>flashspeed=40000000 (40MHz)


http://code.coreboot.org/svn/flashrom/trunk/flashchips.h

::1458400 (0x1640E0) => 32Mbits
::1458415 (0x1640EF) => 32Mbits
#define WINBOND_NEX_ID  0xEF /* Winbond (ex Nexcom) serial flashes */
#define WINBOND_NEX_W25Q32_V 0x4016 /* W25Q32BV; W25Q32FV in SPI mode (default) */

::1327343 (0x1440EF) => 8Mbits
#define WINBOND_NEX_W25Q80_V 0x4014 /* W25Q80BV */


::1261768 (0x1340C8) => 4Mbits
#define GIGADEVICE_ID  0xC8 /* GigaDevice */
#define GIGADEVICE_GD25Q40 0x4013 /* Same as GD25QB */


> print(node.heap())
34288
>
==>剩餘可用memory : 34288 Bytes

wifi module

wifi.getmode
wifi.setmode
wifi.startsmart
wifi.stopsmart
wifi.sleeptype

wifi.sta module

wifi.sta.config
wifi.sta.connect
wifi.sta.disconnect
wifi.sta.autoconnect
wifi.sta.getip
wifi.sta.getmac
wifi.sta.setip
wifi.sta.getap : scan and get AP list
wifi.sta.status
wifi.stat.getbroadcast

wif.iap module

wifi.ap.config
wifi.ap.getip
wifi.ap.setip
wifi.ap.getmac
wifi.ap.setmac
wifi.ap.getbroadcast


uart module

baud = 300, 600, 1200, 2400, 4800, 9600, 19200, 38400, 57600, 74880, 115200, 230400, 460800, 921600, 1843200, 2686400. 
心得: Baud Rate可以儘量設高點,太低有時Lua command出錯"
> print("Heap=".. node.heap())
tmr.delay(1000)
print(no>> de.info())

stdin:2: ')' expected (to close '(' at line 1) near 'de'
由上看出,若輸出不夠快則輸入值會影響輸輸入,此應該是Lua的Bug吧!!!!!????(待查證)

註: 各廠USB-Serial不見得支援所有Baud Rate, 例如PL2303 在Ubuntu12.04下不支援 1843200 及2686400,不知是硬體還是軟體限制? 
補充: 同樣Ubuntu環境用FT232RL可設達2686400, 貴一點還是值得的......
補充: 同樣Ubuntu環境用CH341不支援 1843200 及2686400
setup uart  in init.lua 
>print(uart.setup(0,921600,8,0,1,1))
921600

uart.setup
uart.on
uart.write

https://github.com/nodemcu/nodemcu-firmware/issues/15
https://github.com/nodemcu/nodemcu-firmware/issues/57

等待資料接收,最大可設255 Bytes, 下面範例為接收4個bytes

uart.on("data", 4, 
      function(data)
        print("receive from uart:", data)
        if data=="quit" then 
          uart.on("data") 
        end        
    end, 0)
    -- when '\r' is received.
    uart.on("data", "\r", 
      function(data)
        print("receive from uart:", data)
        if data=="quit\r" then 
          uart.on("data") 
        end        
    end, 0)


net module

net.createServer
net.createConnection

net.server module
net.server:listen
net.server.stop

net.socket module
net.socket:connect
net.socket.send
net.socket.on
net.socket.close
net.socket.dns


----------------------------------------------------------------------------------------------------------------

>wifi.setmode(wifi.SOFTAP)
>print(wifi.getmode())
2
>print(node.chipid())
10393897
>print("ESP_"..string.format("%X",node.chipid()))
ESP_9E9929
>print(wifi.ap.getip())
192.168.4.1 255.255.255.0 192.168.4.1
>print(wifi.ap.getbroadcast())
192.168.4.255


NodeMCU 的SoftAp  Name= ESP_XXXXXX 聯入(XXXXXX表示ChipID) , 預設:不需密碼

2015年3月31日 星期二

NodeMCU固件-GPIO/ADC/PWM控制


參考連結: NodeMCU API指令

包括有下列Module:
node
file
wifi
wifi.sta
wifi.ap
timer
gpio
pwm
net
net server
net socket
i2c
adc
uart
1-wire
bit
spi
mqtt
mqtt client


NodeMCU 的 GPIO Pin 對應 ESP8266 GPIO Pin看連結說明.


esp12-3.jpg


NodeMCU 的 GPIO Module定義了12個GPIO Pin,對應如下:


IO indexESP8266 pinIO indexESP8266 pin
0 [*]GPIO167GPIO13 (Color Blue)
1GPIO58GPIO15 (Color Red)
2GPIO49GPIO3
3GPIO010GPIO1
4GPIO211GPIO9
5GPIO1412GPIO10
6GPIO12(Color Green)
** [] D0(GPIO16) can only be used as gpio read/write. no interrupt supported. no pwm/i2c/ow supported. *

GPIO16=0
GPIO5=1
GPIO4=2
GPIO0=3
GPIO2=4
GPIO14=5
GPIO12=6
GPIO13=7
GPIO15=8
GPIO3=9
GPIO1=10
GPIO9=11
GPIO10=12


//亮Red ,暗Green,暗Blue
gpio.mode(GPIO15, gpio.OUTPUT)  gpio.write(GPIO15,1) -- Red on
gpio.mode(GPIO12, gpio.OUTPUT)  gpio.write(GPIO12,0) -- Green off
gpio.mode(GPIO13, gpio.OUTPUT)  gpio.write(GPIO13,0) -- Blue off


關於GPIO Module說明

範例: (Pin index=0~12)

>gpio.mode(4, gpio.OUTPUT)
>gpio.write(4, gpio.LOW)   --點亮GPIO2 LED
>print(gpio.read(4))

0
>gpio.write(4,gpio.HIGH)  --關掉GPIO2 LED
>print(gpio.read(4))

1
>

關於ADC Module說明


測試板ADC是接光敏電阻,越暗,阻值越大,電壓越大,所讀ADC數值就會越大

範例: 

>print(adc.read(0)) --暗

256
>print(adc.read(0)) --亮

0

讀Vdd33電壓
>print(adc.readvdd33()/1000) --read vdd voltage

2.944


關於PWM Module說明
Only 3 pins can be set to PWM mode at the most.

pin: 1~12, IO index
duty: 0~1023, pwm duty cycle, max 1023(10bit).
範例: 

    -- D6 is connected to green led (ESP8266 GPIO15)
    -- D7 is connected to blue led (ESP8266 GPIO12)
    -- D8 is connected to red led (ESSP8266 GPIO13)
    pwm.setup(6,500,512)
    pwm.setup(7,500,512)
    pwm.setup(8,500,512)
    pwm.start(6)
    pwm.start(7)
    pwm.start(8)
    function led(r,g,b)
      pwm.setduty(6,g)
      pwm.setduty(7,b)
      pwm.setduty(8,r)
    end
    led(512,0,0) --  set led to red
    led(0,0,512) -- set led to blue.


燒錄NodeMCU固件-安信可ESP-12測試板


有關 NodeMCU 的相關連結如下:


官網: http://nidemcu.com/


Popular repositories


最新NodeMCU最新固件下載位址:
https://github.com/nodemcu/nodemcu-firmware/releases

20150901補充 : 有float及 integer兩種版本binary... (keyword : LUA_NUMBER_INTEGRAL)
integer vs float version : integer version only support integer as lua number (less memory usage)


Numbers - Lua


my1.jpg

針對Windows用戶的NodeMCU Firmware燒錄步驟:


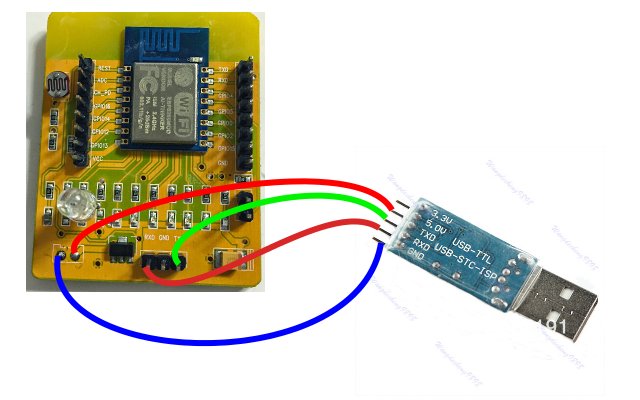
1.將GPIO0 拉LOW(將短路帽接上) ,執行NodeMCU Flasher ( Win32 , Win64)程式,接著設定正確的Com Port ,並按下"Flash" Button.

Begin program

2.等候片刻

Programming

3.顯示現在的Firmware Mac Address 設定

Program success

4.此時,可設定你想燒錄的檔案.

Setting

20150908補充:燒錄時請儘量連接至電腦的USB Port,就是不經過其他Hub,若使用由外部USB Hub接出的Port,會有無法燒錄或燒錄失敗的可能....


燒錄完成後記得GPIO0回復為High(Normal mode),
Baud Rate設成9600 , Reset and reboot 後,會看到如下輸出......


2015年3月26日 星期四

Lua on UEFI


EDK2 下Lua 源碼位置 :Lua

Readme.txt

Embedding Lua
-------------
The Lua library instance, LuaLib, is defined by StdLib.inc.  Since, currently, all applications which
embed Lua are also StdLib applications, StdLib.inc will be included by your package's .DSC file.

The header files required to use LuaLib are in the standard include path at StdLib\Include\Lua.
They may be referenced as:
  #include  <Lua/lua.h>
  #include  <Lua/lualib.h>
  #include  <Lua/lauxlib>
  #include  <Lua/luaconf.h>

Lua/luaconf.h is the Lua configuration file.  If you wish to build Lua with custom characteristics,
this is the file to modify.  Modify the file in StdLib\Include\Lua since the file in the Lua
source tree is just a stub which references the file in StdLib.


Installation on UEFI
--------------------
Install the Lua.efi file into \Efi\Tools.   This is the standalone Lua interpreter.
Create a directory, \Efi\StdLib\lib\Lua.    This is the default location for Lua scripts.

If desired, copy the files from AppPkg\Applications\Lua\scripts, in the source tree, into
\Efi\StdLib\lib\Lua.

Bugs and Other Issues
---------------------
EOF characters, ^D or ^Z, are not properly recognized by the console and can't be used to
terminate an application.  Use os.exit() to exit Lua.


使用操作如下:


fs0>lua
>require("myprint")
>viewtable(package.loaded)
>print(package.path)
>print(package.cpath)


Download : efi.zip


只有lua才能编译出小于200K的代码吗?NO! Python 也可以 ...


有空來試試Python on UEFI


C Library(Module) Loader for UEFI Lua


require("mylib")    // load mylib.efi or mylib.so or mylib.dll

本篇學習如何建立在Uefi 下可供Lua載入的library

試圖讓library能由Lua C Loader 載入

關鍵檔案在src/loadlib.c


LUA_USE_DLOPEN :for linux *.so


LUA_DL_DLL :for windows *.dll


/*

119 ** {========================================================================

120 ** This is an implementation of loadlib based on the dlfcn interface.

121 ** The dlfcn interface is available in Linux, SunOS, Solaris, IRIX, FreeBSD,

122 ** NetBSD, AIX 4.2, HPUX 11, and  probably most other Unix flavors, at least

123 ** as an emulation layer on top of native functions.

124 ** =========================================================================

125 */
126 
127 #include <dlfcn.h>
128 
129 static void ll_unloadlib (void *lib) {
130   dlclose(lib);
131 }
132 
133 
134 static void *ll_load (lua_State *L, const char *path, int seeglb) {
135   void *lib = dlopen(path, RTLD_NOW | (seeglb ? RTLD_GLOBAL : RTLD_LOCAL));
136   if (lib == NULL) lua_pushstring(L, dlerror());
137   return lib;
138 }
139 
140 
141 static lua_CFunction ll_sym (lua_State *L, void *lib, const char *sym) {
142   lua_CFunction f = (lua_CFunction)dlsym(lib, sym);
143   if (f == NULL) lua_pushstring(L, dlerror());
144   return f;
145 }
146 
147 /* }====================================================== */
148 
149 


222 #undef LIB_FAIL
223 #define LIB_FAIL    "absent"
224 
225 
226 #define DLMSG   "dynamic libraries not enabled; check your Lua installation"
227 
228 
229 static void ll_unloadlib (void *lib) {
230   (void)(lib);  /* not used */
231 }
232 
233 
234 static void *ll_load (lua_State *L, const char *path, int seeglb) {
235   (void)(path); (void)(seeglb);  /* not used */
236   lua_pushliteral(L, DLMSG);
237   return NULL;
238 }
239 
240 
241 static lua_CFunction ll_sym (lua_State *L, void *lib, const char *sym) {
242   (void)(lib); (void)(sym);  /* not used */
243   lua_pushliteral(L, DLMSG);
244   return NULL;
245 }


初步判斷整個過程是利用dlopen 及 LoadLibraryEx的加載過程.......

疑問: Uefi 有Dynamic Load Library架構嗎?好像是沒有,載入Library有重定位問題,UEFI 可由載入的Application or Driver 中,對應出所要的Function ?要將Library以UEFI Driver 常駐形式存在,且初始化時,要建立FunctionName及FunctionAddress 對應關係


static void ll_unloadlib (void *lib)

static void *ll_load (lua_State *L, const char *path, int seeglb)

static lua_CFunction ll_sym (lua_State *L, void *lib, const char *sym)


在UEFI 下實現構想如下:

1.建立 EFI_LUA_DLL_PROTOCOL,用於Function name查找
2.於ll_load時載入 Lua Module Uefi Driver
3.於ll_unloadlib時卸載 Lua Module Uefi Driver
4.於ll_sym時call method 取得Function Address


 static int ll_loadfunc (lua_State *L, const char *path, const char *sym) {
287   void *reg = ll_checkclib(L, path);  /* check loaded C libraries */
288   if (reg == NULL) {  /* must load library? */
289     reg = ll_load(L, path, *sym == '*');
290     if (reg == NULL) return ERRLIB;  /* unable to load library */
291     ll_addtoclib(L, path, reg);
292   }
293   if (*sym == '*') {  /* loading only library (no function)? */
294     lua_pushboolean(L, 1);  /* return 'true' */
295     return 0;  /* no errors */
296   }
297   else {
298     lua_CFunction f = ll_sym(L, reg, sym);
299     if (f == NULL)
300       return ERRFUNC;  /* unable to find function */
301     lua_pushcfunction(L, f);  /* else create new function */
302     return 0;  /* no errors */
303   }
304 }


print(package.path)
require("hello")

(收工)

2015年3月24日 星期二

Lua 認識與語法學習


http://www.lua.org/


Lua是一種輕量語言,它的官方版本只包括一個精簡的核心和最基本的庫。這使得Lua體積小、啟動速度快。它用標準C語言編寫並以原始碼形式開放,編譯後僅僅一百餘K,可以很方便的嵌入別的程式裡。和許多「大而全」的語言不一樣,網路通訊、圖形介面等都沒有預設提供。但是Lua可以很容易地被擴充功能:由宿主語言(通常是C或C++)提供這些功能,Lua可以使用它們,就像是本來就內建的功能一樣。事實上,現在已經有很多成熟的擴充功能模組可供選用。
Lua是一種多重編程範式的程式設計語言:它只提供了很小的一個特性集合來滿足不同編程範式的需要,而不是為某種特定的編程範式提供繁雜的特性支援。例如,Lua並不提供繼承這個特性,但是你可以用元表來模擬它。諸如命名空間、類這些概念都沒有在語言基本特性中實作,但是我們可以用表結構(Lua唯一提供的複雜資料結構)輕易模擬。Lua可以在執行時隨時構造出一個函式,並把它看作一個物件(正是所謂的first class function),這個特性可以很好的滿足函數語言程式設計的需要。這是提供了這些基本的元特性,我們可以任意的對語言進行自需的改造。
Lua原生支援的資料類型非常之少,它只提供了數字(預設是雙精度浮點數,可配置)、布爾量、字串、表、子程式、協程(coroutine)以及用戶自訂資料這幾種。但是其處理表和字串的效率非常之高,加上元表的支援,開發者可以高效的模擬出需要的複雜資料類型(比如集合、陣列等)。
Lua是一個動態弱型別語言,支援增量式垃圾收集策略。有內建的,與作業系統無關的協作式多執行緒(coroutine)支援。
有8種基本類型:nil、布爾值(boolean)、數字型(number)、字串型(string)、用戶自訂類型(userdata)、函式(function)、執行緒(thread)和表(table)


關於Lua語法,可看這本書.


相關參考資料:

Lua - 維基百科,自由的百科全書 - Wikipedia

[PDF] Programming in Lua - CentOS中文站

Lua 5.1 参考手册 - 云风工作室

edartuz/lua-serial · GitHub

http://gamedevgeek.com/tutorials/getting-started-with-lua/

2015年3月21日 星期六

NodeMCU for ESP8266

NodeMcu
超简单的物联网开发平台
一款开源快速硬件原型平台,包括固件和开发板,用几行简单的Lua脚本就能开发物联网应用
基于乐鑫esp8266的NodeMcu开发板,具有GPIO、PWM、I2C、1-Wire、ADC等功能,结合NodeMcu 固件为您的原型开发提供最快速的途径。
由BOM裡可看出此開發板的USB-serial 是採用CH340G晶片,ESP8266是採用ESP-12模塊,LDO採用SPX3819M5-L-3-3(500mA, Low-Noise LDO Voltage Regulator)
The ESP-12 has a 2mm pitch, which means you cannot access all the pins on a breadboard or a perforated / dot matrix directly, which have a 2.54mm pitch (distance between adjacent pins).
https://github.com/nodemcu/nodemcu-firmware

A lua based firmware for wifi-soc esp8266

Build on ESP8266 sdk 0.9.5
Lua core based on eLua project
cjson based on lua-cjson
File system based on spiffs
Open source development kit for NodeMCUnodemcu-devkit
Flash tool for NodeMCU nodemcu-flasher