有關 NodeMCU 的相關連結如下:
官網: http://nidemcu.com/
Popular repositories
最新NodeMCU最新固件下載位址:
https://github.com/nodemcu/nodemcu-firmware/releases
20150901補充 : 有float及 integer兩種版本binary... (keyword : LUA_NUMBER_INTEGRAL)
integer vs float version : integer version only support integer as lua number (less memory usage)
Numbers - Lua
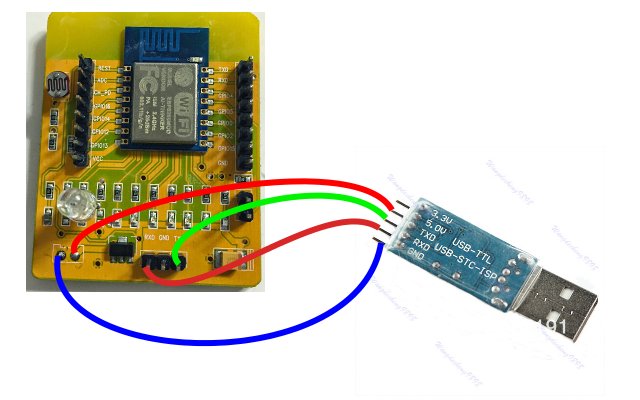
針對Windows用戶的NodeMCU Firmware燒錄步驟:
1.將GPIO0 拉LOW(將短路帽接上) ,執行NodeMCU Flasher ( Win32 , Win64)程式,接著設定正確的Com Port ,並按下"Flash" Button.
2.等候片刻
3.顯示現在的Firmware Mac Address 設定
4.此時,可設定你想燒錄的檔案.
20150908補充:燒錄時請儘量連接至電腦的USB Port,就是不經過其他Hub,若使用由外部USB Hub接出的Port,會有無法燒錄或燒錄失敗的可能....
燒錄完成後記得GPIO0回復為High(Normal mode),
Baud Rate設成9600 , Reset and reboot 後,會看到如下輸出......
燒錄完成後記得GPIO0回復為High(Normal mode),
Baud Rate設成9600 , Reset and reboot 後,會看到如下輸出......


註:Ubuntu下的Chrome有可能需要root權限才能存取Serial Port
針對Linux用戶可以用ESPTools, 請參照下連結文章進行:
http://www.whatimade.today/flashing-the-nodemcu-firmware-on-the-esp8266-linux-guide/
If GPIO0 and GPIO15 is pulled down and GPIO2 is pulled high when the module leaves reset, then the bootloader will enter the UART download mode. The ROM auto-bauds, that is, it will automagically detect which baud rate you are using. esptool defaults to 115200.
esptool uses the RTS and DTR modem status lines to automatically enter the bootloader. Connect RTS to CH_PD (which is used as active-low reset) and DTR to GPIO0.
RTS ----- CH_PD
DTR ---- - GPIO0
(0x00000)INTERNAL://FLASH
(0x10000)INTERNAL://IROM
(0x7c000)INTERNAL://DEFAULT ----->esp_init_data_default.bin (for 26M Crystal)
(0x00000)INTERNAL://FLASH
(0x10000)INTERNAL://IROM
(0x7c000)INTERNAL://DEFAULT ----->esp_init_data_default.bin (for 26M Crystal)
(0x7e000)INTERNAL://BLANK -----> blank.bin
沒有留言:
張貼留言